Custom white boxes may look simple but their production involves much more than folding a sheet of cardboard. The material must suit the product. The structure must close properly and the printed design must remain clear on every visible panel. This guide explains how custom white boxes are made from the first measurement through to the final quality check.
White packaging boxes are used for cosmetics and gifts as well as clothing, food products and retail items. Their clean surfaces give businesses a flexible base for logos and product information. They can also be left mostly plain for a neat and understated presentation.
Quick answer: Custom white boxes are made by measuring the product and selecting a suitable board. A dieline is created before the artwork is printed. The board is then cut and creased before being folded and glued into shape. Finished boxes are checked for size and print quality before delivery.
What Are Custom White Boxes?
Custom white boxes are packaging cartons produced to suit a particular product or brand. Their dimensions and material can be adjusted instead of relying on a standard box from a shop. Businesses can also select the box style and printing as well as finishes and internal inserts.
The word “white” usually describes the outer surface of the board. It does not mean every white box uses the same material. A lightweight folding carton may be made from white paperboard. A delivery box may require white corrugated board. Premium presentation packaging can be made from thick rigid board wrapped in white paper.
This choice affects the strength and appearance of the finished packaging. It also influences how the box is printed and assembled.
How Are Custom White Boxes Made?
The manufacturing process starts with the product rather than the box. Its size and weight help determine the dimensions and board grade. A structural template is then created. Artwork is placed on that template before the board is printed and cut. The flat pieces are folded and glued before the completed boxes are inspected.
Although the exact process changes between box styles the main stages usually include:
- Measuring the product
- Selecting a suitable packaging material
- Choosing the box structure
- Creating a dieline
- Preparing and approving the artwork
- Printing the board
- Applying optional surface finishes
- Die-cutting and creasing
- Folding and gluing
- Checking the completed packaging
Step 1: Measure the Product
Accurate measurements provide the foundation for a well-fitted box. The length and width as well as the depth of the product must be recorded in its packed position. Any cap or handle that extends beyond the main body should be included.
The measurement process should also account for everything placed inside the box. This may include tissue paper or a product card. It could also include a cardboard or foam insert. Leaving too little room can make the carton difficult to close. Leaving too much room may allow the product to move.
Product weight matters too. A heavier item can place more pressure on the base and side panels. It may need a stronger board or a box style with a reinforced bottom.
Common Custom White Box Sizes
Custom-made white boxes can be produced to match the size of a product. The dimensions below are general examples rather than fixed options. Measure the product in its intended packing position and include any space required for tissue or padding as well as an insert.
| Size Category |
Example Dimensions (L × W × D) |
Possible Uses |
| Extra Small |
70 × 50 × 25 mm |
Jewellery, samples and small accessories |
| Small |
100 × 70 × 40 mm |
Soap, cosmetics and compact retail products |
| Medium |
150 × 100 × 50 mm |
Skincare sets, candles and gift items |
| Large |
220 × 160 × 80 mm |
Clothing, gift sets and bundled products |
| Extra Large |
300 × 220 × 100 mm |
Apparel, subscription packs and larger gifts |
These measurements are only a starting guide. The ideal size depends on the product shape and weight as well as the chosen board and box structure. A sample or prototype can be used to check the fit before full production.
Expert tip: Confirm whether the measurements refer to the usable internal space or the outside of the box. Board thickness and folded panels can reduce the room available inside. Testing the proposed dimensions with your fully packed product can help prevent fitting problems before production.
Step 2: Select the White Packaging Material
There is no single material that works for every custom white box. The right choice depends on the product and how the packaging will be handled.
White Paperboard
White paperboard is often used for lightweight retail cartons. It provides a smooth surface for colour printing and fine design details. It can be cut and folded into tuck-end boxes as well as sleeves and small product cartons.
Paperboard is suitable for products such as cosmetics and soaps or small accessories. The board thickness should still be selected according to the packed weight.
White Corrugated Board
Corrugated board contains a shaped paper layer between flat liner sheets. This structure gives the box more support and cushioning than a thin folding carton.
It is commonly selected for mailer boxes and subscription packaging as well as larger products. A white outer liner creates a cleaner printing surface while the fluted centre provides added strength.
White Rigid Board
Rigid board is much thicker than folding carton material. It is normally covered with printed or coloured paper rather than printed directly in the same way as standard paperboard.
This material is often used for gift boxes and presentation packs. It can produce a firm structure that does not collapse flat during normal use. Magnetic lids and drawer boxes as well as two-piece styles can be made from rigid board.
Kraft Board with a White Surface
Some boxes combine a natural board construction with a white outer surface. This option can provide a clean exterior while retaining the character or strength of kraft-based material. The exact appearance can vary between board grades so a physical sample may be useful before a large order.
Step 3: Choose the Box Style
The structure determines how the packaging opens and closes. It also affects the amount of material required and the time needed for assembly.
| Box style |
How it works |
Common uses |
| Tuck-end box |
Closing flaps tuck into the carton at one or both ends |
Cosmetics, skincare and small retail products |
| Auto-lock bottom box |
The base folds into a locking structure during assembly |
Products that require added base support |
| Mailer box |
A hinged lid folds over the base with side flaps |
Ecommerce orders and subscription packs |
| Two-piece box |
A separate lid fits over a matching base |
Gifts, clothing and presentation packaging |
| Drawer box |
An inner tray slides into an outer sleeve |
Jewellery, cosmetics and premium products |
| Window box |
A cut-out section displays part of the product |
Retail goods and selected food packaging |
A simple structure may be practical for fast packing. A more detailed style can create a stronger unboxing experience. The decision should be based on function first. Decorative features can then be added without making the packaging difficult to use.
Step 4: Create the Dieline
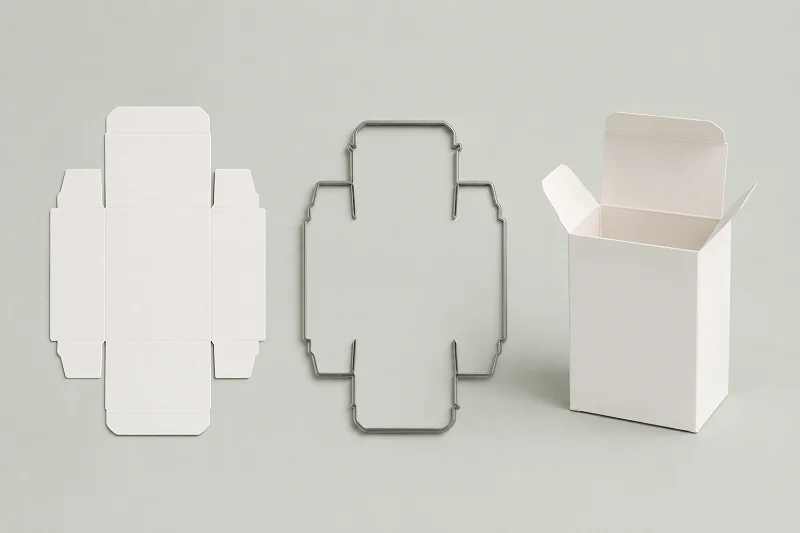
A dieline is the flat technical layout used to produce a box. It shows every panel and flap before the board is cut and folded. It also identifies the cutting lines and crease lines as well as glue areas.
The dieline must match the required internal dimensions. It should also account for the thickness of the chosen material. This is particularly important for rigid and corrugated boxes because thick board changes how panels meet at the corners.
Artwork is placed onto the dieline after the structure has been confirmed. Important text and logos should remain inside safe areas. Content positioned too close to a fold or cut line may shift or become difficult to read.
Step 5: Prepare the Packaging Artwork
A white surface gives designers plenty of freedom but the artwork still needs careful preparation. Some brands use the white board as part of the design and print only a logo or short message. Others cover several panels with colour and product information.
The artwork may include:
- A business name and logo
- Product details
- Ingredients or care instructions
- A barcode or QR code
- Website and contact information
- Handling or recycling guidance
All required panels should be checked before printing. The front may look correct while a side panel contains outdated information. A digital proof gives the customer an opportunity to review the placement and spelling. It also shows how the design will sit across folds and edges.
A digital proof is useful for checking layout but screens cannot reproduce every material and finish exactly. A physical sample may be considered when colour or construction is critical.
Step 6: Print the White Board
The printing method is selected according to the design and quantity as well as the packaging material. Digital printing can suit shorter runs and artwork with several colours. Offset printing is often considered for detailed designs and larger production quantities. Flexographic printing is commonly associated with corrugated packaging and simpler graphics.
White board can make colours appear clean and bright. However the final result can still change with the surface texture and coating. Uncoated board tends to absorb more ink. Coated stock can produce a smoother and sharper appearance.
Not every white box needs heavy printing. A restrained design can use the original white surface with one or two carefully positioned brand elements. This may also keep important product information easier to find.
Step 7: Apply Optional Finishes
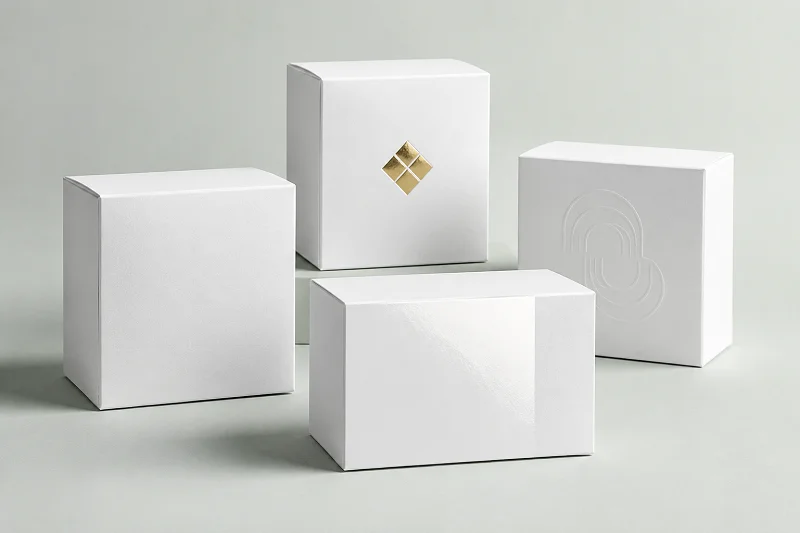
Surface finishes can change how the packaging looks and feels. They should support the design instead of being included simply because they are available.
| Finishing Option |
Appearance and Feel |
Suitable Use |
| Matte Lamination |
Creates a smooth surface with reduced shine. It may also help protect the box from light handling marks. |
Minimal designs and understated retail packaging |
| Gloss Lamination |
Adds a reflective surface that can make printed colours appear brighter. |
Colourful packaging and eye-catching retail displays |
| Soft-Touch Lamination |
Provides a soft and smooth tactile finish. Handling marks may be more visible on some printed areas. |
Premium products and luxury presentation boxes |
| Foil Stamping |
Adds a metallic or coloured foil detail to selected areas such as logos and borders. |
Brand highlights and decorative details |
| Embossing and Debossing |
Embossing raises a design above the surface while debossing presses it into the board. |
Logos and simple graphics that need added depth |
| Spot UV |
Applies a glossy coating to chosen areas and creates contrast against a matte surface. |
Logos and patterns as well as selected text |
Step 8: Die-Cut and Crease the Board
After printing and finishing the sheets are ready for cutting. A die is made in the shape of the approved box layout. Sharp rules cut the outer shape while other rules press the fold lines into the board.
These pressed lines are called creases or scores. They help panels fold in the intended position. Without accurate creasing the board may crack or bend unevenly. Printed elements can also move out of alignment when the box is assembled.
Window openings and locking tabs can be created during the same stage. Waste material is removed after cutting. The flat box pieces are then separated and prepared for assembly.
Step 9: Fold and Glue the Box
Many folding cartons are supplied flat to reduce storage space. During production one side seam may be glued so the box can be opened and packed later. Auto-lock bases and other complex structures may require additional folding points.
Rigid boxes follow a different process. Their thick board pieces are cut and joined before being wrapped with printed or coloured paper. The completed structure is usually delivered already formed unless it has been designed as a collapsible rigid box.
The adhesive must suit the material and any surface coating. Poor glue adhesion can cause a seam to open during packing or transport. For this reason the finish and assembly method should be considered together.
Step 10: Add Inserts or Windows
An insert can hold a product in a set position. It may also create separate spaces for accessories or multiple items. Common options include folded cardboard and corrugated fitments as well as foam for selected presentation boxes.
The insert opening must match the product closely enough to provide support without making removal difficult. The complete pack should be tested with the actual product rather than relying only on estimated dimensions.
A window allows customers to view part of the item before opening the box. Some designs use an open cut-out. Others add a clear film behind the opening. Businesses packaging food or sensitive products should confirm that all materials are suitable for the intended use and contact conditions.
Step 11: Inspect the Finished White Boxes
Quality checking takes place before the order is packed for delivery. The inspection should look beyond the colour of the exterior. The structure must also perform as intended.
Common checks include:
- Confirming the finished dimensions
- Checking print placement and colour consistency
- Inspecting folds and glued seams
- Testing tabs and closing flaps
- Reviewing window and insert placement
- Looking for scuffs or damaged corners
- Testing the box with the intended product
A white surface can reveal dirt and production marks more easily than some darker colours. Clean handling and suitable packing are therefore important during the final stages.
Can You Make a White Box at Home?
A basic white cardboard box can be made at home for a craft project or prototype. You will need white card and a ruler as well as a pencil and suitable cutting tool. A scoring tool helps create straighter folds. Adhesive or locking tabs can be used to hold the finished shape together.
Start by drawing or printing a flat box template. Cut around the solid outer lines and score the fold lines without cutting through the board. Fold each panel inward and test the structure before applying adhesive.
Take care when using blades and cutting equipment. Work on a stable cutting surface and keep your hands away from the cutting path.
A handmade sample can help you understand the general shape. It may not provide the accuracy or finish required for commercial packaging. Professional equipment produces more consistent cuts and creases across a larger quantity.
Handmade Boxes vs Professionally Made White Boxes
| Consideration |
Handmade box |
Professionally made box |
| Best use |
Crafts and early prototypes |
Retail, ecommerce and branded products |
| Size consistency |
Can vary between boxes |
Produced from one approved dieline |
| Printing |
Usually limited |
Can include full artwork and brand colours |
| Finishing |
Mostly applied by hand |
Options may include lamination, foil and embossing |
| Quantity |
Suitable for one or a few boxes |
Suitable for repeat and wholesale orders |
| Product fit |
Adjusted manually |
Planned around supplied product dimensions |
Making one box by hand may be practical when testing an idea. Commercial production becomes more useful when a business needs consistent dimensions and repeatable branding. It also provides access to materials and structural options that can be difficult to reproduce with basic tools.
What Should You Decide Before Ordering Custom White Boxes?
Preparing the right information can make the quotation and design process much easier. Start with the product dimensions and packed weight. Decide whether the product needs an insert or protective space. You should also consider how the box will be stored and displayed or delivered.
It helps to provide the following details:
- Required internal or external dimensions
- Product weight
- Preferred box style
- Estimated order quantity
- Printing colours and artwork
- Required surface finish
- Window or insert requirements
- How the box will be transported
If you are unsure about the structure you can begin with the product itself. A packaging supplier can use its measurements and intended use to recommend a suitable starting point.
Bring Your White Packaging Idea to Life
The best white packaging is not created by colour alone. It comes from the right combination of size and material as well as structure and print. Each decision should help the box protect the product and represent the brand clearly.
Fine Packaging produces custom white boxes for Australian businesses. You can choose the dimensions and box style as well as printing and finishing options. Our minimum order starts at 100 units. Contact us at support@finepackaging.com.au for a free quote and discuss your packaging requirements. Free shipping is also available across Australia.
Frequently Asked Questions
What material is used to make custom white boxes?
Custom white boxes can be made from paperboard or corrugated board as well as rigid board. The right material depends on the product weight and how the box will be used. Lightweight retail products may suit paperboard. Boxes intended for shipping or premium presentation may require a stronger material.
How is a custom white box cut into shape?
A flat box layout called a dieline is created first. A cutting die then trims the board to the required shape. Creasing rules press the fold lines into the material. This helps each panel fold neatly during assembly.
Can I make a white cardboard box at home?
Yes. A simple white cardboard box can be made at home with a template and white card. You will also need a ruler and a scoring tool as well as a suitable cutter. Handmade boxes are useful for crafts and early prototypes. Professional production provides greater consistency for business orders.
Can white boxes be made to fit any product?
Custom dimensions can be planned around many product shapes and sizes. Measure the product in its packed position. Include any lids or handles that extend beyond the main body. You should also allow space for tissue or padding and inserts when required.
Can a logo be printed on a white box?
Yes. A logo and supplied artwork can be printed on the outside of the box. Selected styles may also support printing on the inside. White board provides a clean base for brand colours and product information.
Why is a box sample important before production?
A sample can help confirm the size and structure before the full order is made. It allows you to test how the product sits inside the box. You can also review the opening style and insert position. Printed samples may be considered when colour and finish need closer checking.
Can inserts be added to custom white boxes?
Yes. Inserts can help hold a product in place and reduce movement inside the box. Options may include folded cardboard or corrugated fitments as well as foam for selected presentation boxes. The insert needs to follow the product’s shape and packed size for a secure fit.
Which finish works best on a white box?
Your preferred appearance and surface feel will help determine the most suitable finish. Matte lamination creates a restrained surface. Gloss can make printed colours appear brighter. Foil and embossing can highlight a logo. Spot UV can add contrast to selected details.
Are custom white boxes recyclable?
Many paperboard and corrugated white boxes may be recyclable when they are clean and free from unsuitable attachments. Laminates and plastic windows can affect local recycling options. Material choices should be reviewed with the supplier and local recycling guidance.
What should I provide when ordering custom white boxes?
Provide the product dimensions and packed weight along with the required quantity. You should also explain how the box will be stored or displayed or delivered. Share your artwork and preferred box style if these are already available.


